Centrifugal Iso-Finishing Technology for New Edge and Surface Finishing Challenges
- Jan 9, 2019
- 10 min read
Updated: Dec 10, 2020
By David A. Davidson | Deburring/Finishing Technical Group | +1.509.563.9859 ddavidson@deburring-tech-group.com | SEE also: https://lnkd.in/gVgunU9 Contact us for information about (free) sample part processing for your parts.

With the continued advance of multi-axis machining and the increasing utilization of 3D metal printing (additive manufacturing) for actual part production, manufacturing managers and engineers are faced with new and complex challenges related to part deburring and surface finishing.
With conventional subtractive manufacturing technologies, multi-axis machining is bringing down the cost of producing ever more complex part shapes precipitously. In times past, much of manufacturing was concentrated on producing large volumes of parts as economically as possible to achieve economies of scale. Many of the mass finishing technologies still in use today were developed to meet the need of handling large work-flows of identical parts and to produce edge and surface finish conditions on parts that would be consistent and uniform. Part-to-part and lot-to-lot consistency was a major consideration in the development of these technologies and was an important driver of the economic advantage that the processes offered. While uniformity and consistency are still very important part attributes, just-in-time, flexible-manufacturing and production bottle-neck avoidance and other quality-based manufacturing philosophies are driving significant change on the factory and shop floor. These changes are having a significant impact on deburring and mechanical finishing operations. In many cases, there is a much stronger need for capabilities to quickly process smaller part lots of more complex parts, with much tighter tolerance and surface finish requirements.
Metal printed parts manufactured with various additive manufacturing technologies offer a new and entirely different set of challenges. Unlike the edge condition and finish problems associated with conventional manufacturing technologies, additive manufacturing does not produce parts with substantial burrs that are a by-product of cutting or metal-forming operations. They also are free of the non-isotropic machining or grinding patterns common to subtractive operations that can have negative effects on part wear resistance or fatigue resistance. What they do have, in many cases, are unacceptably rough surface finishes that pose severe challenges to many mechanical surface finishing methods. The surface finishes encountered, in many cases, rival that found on unfinished parts from the casting industry in terms of their initial surface roughness and positive skew. High energy finishing methods are required to produce acceptable surface finish values with process cycle times that won’t be a source of bottlenecks or production constraints.
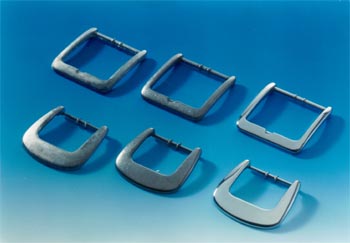
Above: some examples of 3D Finished parts with surface finishes developed with iso-finish processing.
ABOVE: This video demonstrates a three step process that is used to modify rough surfaces to highly polished surfaces with short cycle times.
Challenges from Part Complexity and Surface Finish Requirements. The increased
Sequential Processing. To meet more demanding surface finish requirements, one trait that many of today’s more sophisticated mass finishing operations share is a reliance on multiple-step sequential processing. In this type of processing, very rough surfaces can be brought to a highly polished or micro-finished state. This is done by initially processing the parts with coarse abrasive material, and then following up with a sequence of steps using finer abrasives. Each of the subsequent steps uses an abrasive material that has been calculated to clear and blend-in the abrasive pattern left on the surface by the preceding step. To use a common everyday analogy, almost everyone understands that to produce fine finishes in woodworking applications, it is necessary to use sanding operations with successively finer abrasive grits to produce cabinet or furniture quality surfaces. The same principle holds true when mass finishing metal and some plastic parts when very smooth or polished micro-finished surfaces are required.
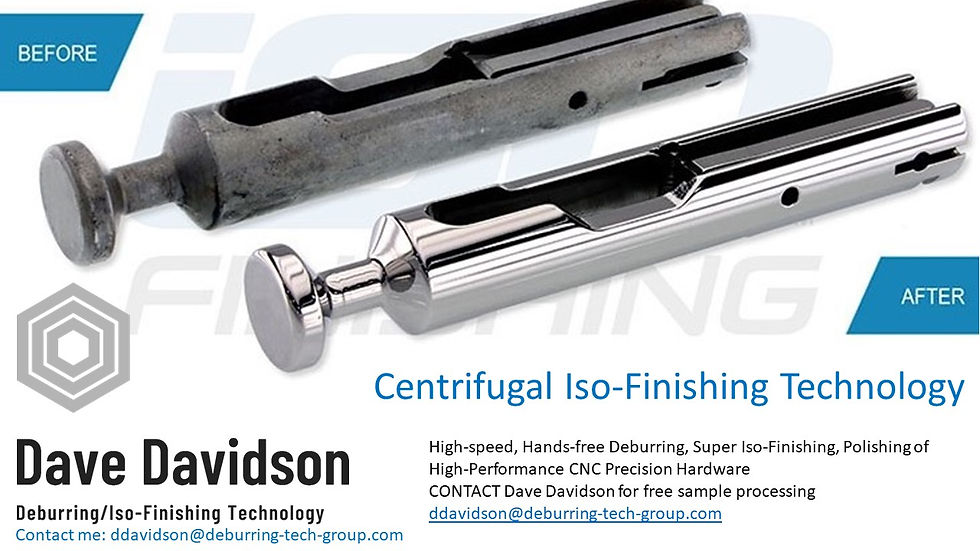
This video demonstrates Centrifugal Iso-Finishing with a multiple sequence process where parts are taken from initial rough machined surfaces to highly polished surfaces by running them in three steps. (1) Abrasive grinding (2) Fine smoothing (3) Final Polishing. In this video example pieces made from aluminum are polished. Other alloys can be polished similarly by changing the abrasive and polishing materials and the machine settings. Parts manufactured from steel, stainless steel, nickel alloys, titanium, cobalt chrome and many others are polished with similar processing.
One time-honored method for producing very refined surfaces on softer metal alloys and some plastics is sequential step dry barrel processing. This technology was originally developed and heavily utilized in the northeastern United States as early as the 1930’s; similar methods were developed concurrently in Europe.

The method was developed primarily to mitigate the high labor costs associated with hand-buffing large numbers of consumer-oriented articles such as eyewear and jewelry. This technique was widely accepted as a standard method for producing very refined consumer acceptable product finishes that had previously been the sole province of hand buffing methods and it is still utilized for these types of applications to this day. This sequential processing principle has been adapted for use in other types of equipment for other part finishing applications. Where reflective or very level surfaces are desired on parts being finished, it is not unusual now to see secondary processes with non-abrasive burnishing media or dry process polishing media develop these more refined surfaces.
Flexible Processing. Many processes have been developed for centrifugal barrel finishing where two or even three steps are utilized to bring part surfaces to very low micro-inch surface profiles, or to develop very reflective surfaces for cosmetic or aesthetic reasons. With other mass finishing processes, it is not unusual to see dedicated equipment assigned to handle each of these processing steps. Centrifugal Iso-Finishing processes typically can process these several steps in the same equipment as the equipment is typically furnished with four processing compartments that run simultaneously, and relatively quick change-outs of processing media are possible. In a factory floor video interview produced by the SME Deburring/Finishing Technical Group and the SME chapter 248 in Spokane WA, Katie MacKay, VP of Mackay Manufacturing elaborated on their transition to centrifugal iso-finishing. The company was struggling with a very complex aluminum part that had numerous drilled holes and edges and planes. Although the company had vibratory finishing equipment at their disposal, this part still required eight hours of hand deburring following the vibratory processing. After transitioning to centrifugal processing, the hand deburring was reduced to less than an hour and justified the purchase of the equipment by itself. Since then, centrifugal processing has become the standard finishing method for the company. Without the machine, the company would need an additional three employees on its deburring staff. Since the installation, the company has developed processing for more than fifty additional part numbers made from titanium, steel, stainless steel, aluminum and plastic. Over two dozen different finishing “recipes” are used to process the different parts to specification. In some cases, parts are finished to highly polished surfaces with low micro-inch surface values. Almost all the deburring and finishing needs of this 135-employee contract machining company with 50,000 square feet of manufacturing space is serviced by this one machine.
See Katie MacKay relate their experience with Centrifugal Iso-finishing at MacKay Manufacturing, a precision CNC contract machining operation specializing in aerospace, medical and other precision machined components at their Spokane, WA location. This video was produced by the author and the local section of SME (Society of Manufacturing Engineers) and the deburring department of MacKay Manufacturing. MacKay is a former winner of the Washington State Manufacturer of the year award.

Positive vs. Negative Surface Skewness. The skew of surface profile symmetry can be an important surface attribute. Surfaces are typically characterized as being either negatively or positively skewed. This surface characteristic is referred to as Rsk (Rsk – skewness – the measure of surface symmetry about the mean line of a profilometer graph). Unfinished parts usually display a heavy concentration of surface peaks above this mean line, (a positive skew). It is axiomatic that almost all surfaces produced by common machining and fabrication methods are positively skewed. These positively skewed surfaces have an undesirable effect on the bearing ratio of surfaces, negatively impacting the performance of parts involved in applications where there is substantial surface-to-surface contact. Specialized high energy finishing procedures can truncate these surface profile peaks and achieve negatively skewed surfaces that are plateaued, presenting a much higher surface bearing contact area. Both experimental and production evidence confirms that surface finishing procedures tailored to develop specific surface conditions can have a dramatic impact on part life. In one example the life of tooling used in the aluminum can stamping operations was extended 1,000% percent or more by improved surface textures produced by this high-energy mechanical surface treatment. Jack Clark, now Principal Scientist at Woodward Inc., and formerly with Surface Analytics, was an early pioneer in the use of centrifugal iso-finishing on race car engines and was able to take Formula One like racing engines that had normally had to be pulled after one or two races and extend their useful service life for an entire racing season.
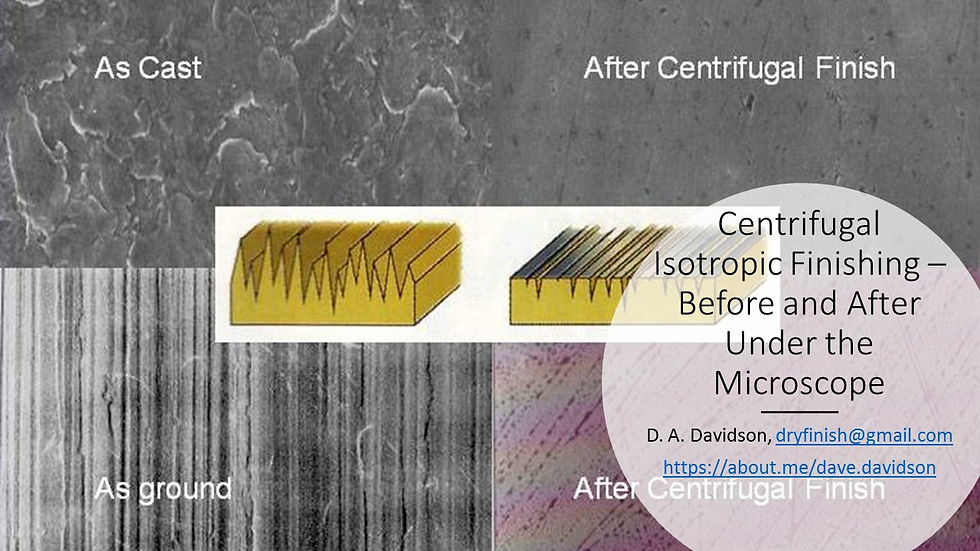
The photos and diagrams above show clearly the difference between isotropic surfaces (surfaces with random textures) and surfaces characterized by a pattern of notices, grooves, lines or scratches (call them what you will) that inherently disadvantageous to part performance and service life. Courtesy of Jack Clark, Surface Analytics, LLC
Directionalized vs. Random (Isotropic) Surface Texture Patterns. Somewhat related to surface texture skewness in importance is the directional nature of surface textures developed by typical machining and grinding methods. These machined surfaces are characterized by tool marks or grinding patterns that are aligned and directional in nature. It has been established that tool or part life and performance can be substantially enhanced if these types of surface textures can be altered into one that is more random in nature. Post-machining processes that utilize free or loose abrasive materials in a high energy context can alter the machined surface texture substantially, not only reducing surface peaks, but generating a surface in which the positioning of the peaks has been altered appreciably. These “isotropic” surface effects have been demonstrated to improve part wear and fracture resistance, increase bearing load ratio and improve fatigue resistance.
Residual Tensile Stress vs. Residual Compressive Stress. Many machining and grinding processes tend to develop residual tensile stresses in the surface area of parts. These residual tensile stresses make parts susceptible to premature fracture and failure when repeatedly stressed. Centrifugal Iso-finishing processes can be implemented to modify this surface stress condition and replace it with uniform residual compressive stresses. Many manufacturers have discovered that as mass finishing processes have been adopted, put into service, and the parts involved have developed a working track record, an unanticipated development has taken place. Their parts are better—and not just in the sense that they no longer have burrs, sharp edges or that they have smoother surfaces. Depending on the application: they last longer in service, are less prone to metal fatigue failure, and exhibit better tribological properties and from a quality assurance perspective are much more predictably consistent and uniform.
The Importance of Centrifugal Iso-Finishing Processes and Compressive Stress Effects. Even simple tumbling can develop residual stresses that can provide some functional improvements to service life in certain components. High-energy mass finishing methods can magnify this effect many times. In the early 1990s some researchers pioneered the use of an electron microscope (SEM) analysis to determine or quantify surface finishes as they relate to possible life extension and component functionality. Some manufacturers now quantify and monitor the surface texture of their parts with 3D texture mapping generated with technologies such as scanning white light interferometry (SWLI).
This early work showed that it was possible to improve functionality and service life of many differing types of components by improvement in metal surface profile and integrity.

LEFT: This graph compares stress levels created by shot peening with that produced by centrifugal barrel finishing with heavy bulk-density non-abrasive media. Centrifugal processing is very common in the spring industry where centrifugally processed springs are said to outlast peened springs by a factor of two.
Processes such as peening are commonly used for metal surface integrity improvement to mitigate crack propagation and improve service life by improving metal fatigue resistance. It has been found that high energy loose media sequential finishing could develop not only compressive stresses but very level, or negatively skewed plateaued surfaces, that provided a great deal more bearing load surface to parts when interacted cooperatively with other part surfaces.
In one application, stamping dies used for forming aluminum can tops were given a useful life of approximately ten times that was anticipated of parts that had not been surface finished with this method. Another application cited by J. Bernard Hignett in an SME technical paper describing centrifugal barrel processing commented on extensive cycling tests conducted by a spring manufacturer. “This ability to improve resistance to fatigue failure is graphically demonstrated by the results of some tests made by a manufacturer of stainless steel coil springs. A group of springs was taken from a standard production run. Half of the sample was finished in the manufacturer’s usual manner of barreling followed by shot peening, while the other half was CBF-treated for 20 minutes. The springs were then tested to failure by compressing them to a stress change from 0 to approximately 50,000 psi. The results showed that all the springs finished by the conventional method failed between 160,000 and 360,000 cycles. The springs that had been processed by CBF failed at between 360,000 and 520,000 cycles, an average improvement of 60 percent.”

Above are shown before and after photographs utilizing SEM (scanning electron microscopy) of as- cast and ground surfaces and those same surfaces after Centrifugal Iso-Finishing. When sequential smoothing and processing operations are utilized surface finishes can be achieved that are down into the single digit micro-inch Ra range.
The mechanism that allows for improved “functionality” for all surfaces is basic to surface performance —to accept the loads imposed and resist wear. Traditional processes that generate form and control fit do not necessarily dictate how that part or assembly will function over time. In recent years, it has been realized that there is another contributor to long term part performance—surface finish. If a manufacturer does not account for surface finish characteristics like lube retention, micro burr removal, identification of torn and folded material, directionality, and load-bearing capability, the performance of components in the system cannot be predicted. High-energy finishing processes can also contribute to more predictable and extended service life by developing useful and uniform compressive stress equilibrium in parts as a hedge against premature fatigue failure.
Through progressive process development, evolving measures, and a mature understanding of the “function” of surfaces, manufacturers can design parts that become assemblies that are in systems performing over predictable, extended lives. This is the key to reduced warranty costs, reduced scrap, higher quality, lower production costs, and satisfied customers and end-users. Centrifugal Iso-Finishing processes can be used to improve part performance and service life, and these processes can be tailored or modified to amplify this effect. Although the ability of these processes to drive down deburring and surface finishing costs, when compared to manual procedures, is well known and documented, their ability to dramatically effect part performance and extend service life is not nearly as well understood by the manufacturing engineering community.
The author wishes to acknowledge technical assistance from the following. Jack Clark, Woodward, Inc.; Dr. Michael Massarsky, Turbo-Finish Corporation; Thomas and Cole Mathisen, Mass Finishing, Inc.; Michael Klein, Iso-Finishing Inc.; and Katie MacKay, MacKay Manufacturing Inc.
Dave Davidson is a volunteer leader with SME and is an advisor to the machining and material removal technical community and a past chair of the Deburring/Finishing Technical Group. He can be reached at ddavidson@deburring-tech-group.com


Comments